Hi, lovelies! As an Altenew Certified Educator, I am joining a fun blog hop where all of us Educators will be sharing our love for Altenew through our handmade goodness/creations! The hop starts from @altenewllc so make sure you start from the beginning!
Here is a small video tutorial for the Card which I have made.
Altenew is giving away a $20 gift certificate to 5 lucky
winners! For a chance to win, please follow @altenewllc and @auzztrinkletsncrafts and leave a comment by 3/3/2021.
SO NOW HOW TO PUT YOUR NAME:
Make sure you comment on the INSTAGRAM POST and NOT HERE (On blog Post)
The link for Insta hop will be https://www.instagram.com/auzztrinkletsncrafts/
Altenew will draw 5 random winners from the comments left on each stop of this Instagram hop and announce the winners on Altenew’s Educator Instagram hop post on 03/05/2021. Head over to your NEXT STOP: Rosie @rosieneust
Please check your Instagram handle and email me right away if there is an error.
Hop List: @altenewllc
@rotejas_magic @kariavan @taniaahmed @crown_focus @irishrosecreations @treasuresinletters @sandespoema @_michelleomurray @terismailbox @channellingmarthaau @yesvirginialu @notableink @teresakim16 @altenew_planner_girl @craftylemur @karens_mini @handmadebytasha13 @everyday_expressions @pixelmavensretreat @vicki.finger @handmadebyteris @sevenscrafts @bridgetcaseydesigns @mylittleatticstudio @evabussom @irenemcbeatle @cardrefinery @designermc55 @jaycee.gaspar @mes_cartes_a_moi @auzztrinkletsncrafts ----- You are here @rosieneust ----- Next Hop @paperaddictpam
Today I am sharing a card which was truly an inspiration from a beautiful lady Natasha Davies . I am so inspired by her work that I tried to create and use one of her techniques in my card.
For my card I have used wow embossing powder to create my background and one of Altenew stamps called Botanical You.
Matrials:
-Botanical You stamps
-Botanical You dies
-Pick me up embossing powder and Embossing Ink
-Neenah Solar white
-Altenew Greenfields Ink pads
-Altenew Sea Shore Ink pads
-Altenew Black Permanent ink pads
Steps:
-For My background I have created a small video which you can watch and follow.
https://m.youtube.com/watch?v=_n2qHL40Nug&t=13s
I took a piece of 4 1/4' x 5 1/2' Cardstock and put painters tapes on the gaps. Then I applied embossing inks on those middle parts.
Once happy I heat embossed using the wow embossing powder Punch.
After that I went ahead and used the ALtenew botanical you stamp set using my green Ink fields ink pads and Sea shore Ink pads . I stamped the word you on another sheet of neenah solar white and die cut the word to stick using foam tape.
I stamped the sentiment with the black permanent ink to finish my card
Hope you all like it. If you have any questions feel free to message me.
Thank you for stopping by . You are here from Amber Rain Davis . Isn't she lovely!!
Today I want to share my four cards which I made with geometric backgrounds and some Floral stamps
CARD 1:
MATERIALS: -Carved Rose stamp and Die Bundle
-Circled Greeting; Thanks Die
-Shine like a Star Background Stamp
-Sequins Antique Gold
-Gold Embossing Powder
-Inks; Parrot Green, Autumn Blaze and crimson also Greenfields Ink pads set for Leaves
-Neenah Solar white 110lbs
-Vellum for sentiments
-Altenew Black permanent Ink pad
STEPS: - First I took neenah solar white measuring 5 1/2' x 4 1/4' and stamped it with the stamp called shine like a diamond using versa mark Ink pad and Heat embossed with Gold Embossing powder.
- With the help of Three colours Parrot Green, Autumn Blaze and crimson I blended my colours evenly on the neenah solar white.
- Then I used the Circled greeting Thanks die and cut out the shape from the middle of my embossed cardstock.
- I took my card base from neenah solar white and stuck behind my coloured cardstock.
-On a separate piece of cardstock I stamped roses using the crimson ink pad and green for my leaves and die cut them out using the coordinating dies.
- After sticking my pcs together , I arranged my carved roses and leaves on the front along with some sequins to finish my card.
CARD 2:
MATERIALS: Geometric Elements stamp and Die Bundle
Fanciful Thanks Die
Geometric Roulette Stencil
Circle Pcs of Vellum
Fine Liner pen set
Black cardstock
Inks; Parrot Green
Neenah Solar white 110lbs
Altenew Black permanent Ink pad
Antique Gold Metallic Ink Spray
STEPS: - First on a piece of neenah cardstock , I stamped my one shapes from the stamp set called Geometric Elements.
- With the help of the Altenew Fine Liner pens I started doing some Zentangles and filling those triangles. I love the class from Amber's Zentangle a must do class for those who would like to learn more about it.
- After filling out my triangles with Zentangles , I die cut out them . And on a separate 5 1/2' x 5 1/2' card stock I used the stencils along with the parrot ink to create my background.
- After that I sprinkled some of the gold spray on my stenciled piece. And also arranged all those Zentangled pcs on the cardstock.
-For the center I cut out a circle from a piece of vellum and also Die cut 3 pcs of Thanks from a black card stock. I stuck all the 3 pcs of thanks together to get a dimensions on my sentiment.
- To finish of my card I put them all together .
CARD 3:
MATERIALS:
Stamps Precious's Blooms
Shine Like a diamond
Black permanent Ink
Hanging Garden Die
two Shades of grey Ink pads
STEPS:
- First I used Shine like a stamp for my background and stamped on a Neenah solar white measuring 4 1/4' by 5 1/2' cardstock .
- Then I trimmed the cardstock in slant so that a part of black cardstock is revealed.
- I stamped my sentiments with white embossing powder on black cardstock.
- I also stamped the flowers from Precisions blooms using my warm grey ink pad sets.
- For my leaves I trimmed and used positives and negatives to have a bit of greenery in the background.
CARD 4:
MATERIALS:
Gem Frame die
Carved rose Stamp and die
Three shades of Ink pads
Neenah Solar White cardstock
STEPS: - For this card I cut out two pcs of Gem frame die and also stamped the carved roses and leaves and die cut them out using my coordinating dies.
- I also had three pcs of card stock which are Black - 4 1/4'x 5 1/2' , Red is 4 x 5 1/4' and white is 3 3/4' x 5- Then I arranged my pcs on the cardstock and I used the Congrats Sentiments from from stamp set called geometric patterns.
Projects:
We welcome any projects that feature our Altenew products! Please refrain from using other companies' branded labels on project photos, especially for product categories that are currently available in the Altenew store. Just make sure that an Altenew product is the focus of your project.
Please create a project(s) that features "Floral with Geometric Elements". You can create card sets, wedding/anniversary cards, friendship cards... home decor projects, etc.
Prizes:
Altenew is giving away a $30 gift certificate to 1 lucky winner! Please leave a comment here on the Altenew Card Blog(https://wp.me/p6Dps1-cz1) by 12/21/2020 for a chance to win.
We’ll also draw a winner to receive a $15 Altenew gift certificate from the comments left on each designer’s blog on the blog hop list below. All winners will be announced on theAltenew Winners Page on 12/23/2020.
There’s MORE! What’s a hop without YOU?! We have included an Inlinkz
for you to enter your gorgeous Altenew “Floral with Geometric Elements” creations. We will pick 2 of our favorite handmade creations from those who joined the linky party and they will each receive a $15 Altenew gift certificate!
Today I am sharing a project which I designed where you can jot down the important Birthday's of your family and friends and hang them in your craft room so that you can organize their gifts and cards for the month. It is also a very nice project which you can make as a gift for this Christmas.
The kits are available to buy in stock which will be sent to you with instructions. If there is any problem while making them feel free to contact me for any help.
Today , I am sharing a card which I have made for Helmar. I have used Altenew Flowering citrus Stamp , Bleeding Tissue papers and scrap dots from helmar.
For the Process please hop on to my Youtube Channel on how I created this lovely project.
Hope you had a wonderful time reading Amber Rain Davis blog. Isn't she a wonderful crafter?
Welcome back to my another Altenew Educator Blog Hop.
Today I am sharing with you some of my cards which I planned to take a class on before this COVID 19 started but due to restrictions had to cancel my classes.
Materials Used:
Altenew Aztec Stencil
Altenew Mega Hydrangea Stencil
Altenew Ornate Cover Die
Altenew Hang in there dies
Altenew Halftone Everything Stamp
Altenew Mega Greeting Stamp
Altenew Halftone smile Stamp
Altenew fancy thanks Dies
Altenew Ink pads
Altenew Adhesive runner
Neenah Solar White for base.
Black cardstock
Blending Brushes
Lets go ahead and I will try and explain how I made these cards. I have also tried to make video's for this purpose too.
Card 1: Ornate Cover dies and Mega Greeting Stamp set
Steps for creating this card you can follow my video below.Measurements and instructions are below
https://youtu.be/MjbwRfTB5tE
Card 2: Using Stencils as stamping background
Steps for creating this card you can follow my video below. Measurements and instructions are below
https://youtu.be/azxZJa2wJmo
The Neenah Solar white measure 5 1/2 inches by 4 1/4 inches
The Base inks used in this video is Ultra marine, Magenta and Deep iris for my background spritz with water. The Green Ink pad is the evergreen ink pad
Once my background was done I took the one lighter shades of ink pads from the same colour family to fill my white blacks on the base. Inks which I have used are baby Pink, lavender Fields and eastern Sky.
For my hang in there card , I used the base black card stock measuring 5 1/2 inches by 4 1/4 inches. Trimmed down my background base to the size of 4 inches by 5 1/4 inches and white base was just the middle size.
Card 3: Heat Embossing the background Using the stencils
Steps for creating this card you can follow my video below. Measurements and instructions are below
https://youtu.be/V9CwGWvktA8
For this Card firstly I am stamping over the Ornate cover dies with my versamark Ink pad with white embossing powder and heat embossed it.
For the Ink pads I have used Crimson for red, Autumn Blaze and hunter green.
Prizes:
Altenew is giving away a $20 gift certificate to 5 lucky winners! Please leave a comment here on the Altenew Card Blog(https://wp.me/p6Dps1-c5T) by 9/19/2020 for a chance to win.
We’ll also draw a winner to receive a $15 Altenew gift certificate from the comments left on each designer’s blog on the blog hop list below. All winners will be announced on theAltenew Winners Page on 9/22/2020.
There’s MORE! We will pick 2 of our favorite handmade creations from those who joined the linky party and they will each receive a $15 Altenew gift certificate!
Today , I have created a peony flower and sunflower using helmar 450. the flower tutorial was given by a lady from Thailand and I just put them together with the help of her tutorial. She did send me all the supplies to make my flowers.
Today , I am sharing a project which was created partially created by my son and the rest by me. As I my son is in his school holidays so we went to local bunnings shop and bought a MDF frame.
I also bought some Acrylic colour pens from Life of color and I loved how smooth they are to work with.
So firstly my son did some zentangle on the frame with Life of colour Black pen and made some geometric design on it.
Then i went ahead and filled it with the some coloured life of colour pens .
Once finished off my painting I sealed it 2-3 layers with the Crystal Kote Gloss Varnish. to get a glossy finish.
Hope you like my project .
The products which I used from Helmar you can buy them on this website.
Today I am sharing my project as a guest designer for Altenew again . Sorry my post is a bit long as wanted to explain on how I create my cards.
Here are my projects. Its was really a fun and a good way to challenge myself for this. Projects which I have created are show casing the new July release for Altenew.
Project 1: Luminary With Floral In "N" Out Border Die
Materials Needed:
Altenew Floral In N Out border die
Cardstock Measuring 8 inches x 13 inches ( do not cut the barcode out)
Glitter or Mirror Cardstock 4 3/8 inch x 4 3/8 inch
Glitter or Mirror cardstock 2 inches x 13 inches
Lights to put inside the box
Altenew Tabbed Die
Steps:
First take a piece of cardstock measuring 8 inches x 13 inches
Keeping the shorter side on the top Score at 1 3/4 inches
Now keeping the cardstock on longer side score at 3', 6' , 9' and 12 inch. (see the picture for reference).
Before moving on to cut the edge put your dies on the box area to die cut the images out.
Now cut the areas as shown in picture. Only till the 1 3/4 inch fold.
Once its ready put everything together with the help of glue or strong tape.
Your semi finished Luminary will look like the picture below.
Now making the lid and the legs.
For the lid I took a glitter card stock which measures 2 inches x 13 inches.
Now score the glitter cardstock at 1/2 inch on the long side.
Also score on the short side at 3 inch , 6 inch, 9 inch and 12 inch.
For making it look like legs I used the Altenew Tabbed dies to make the legs.
Assemble the legs just like the box was assembled and stick at the bottom of the box.
Bottom once put together will look like this
Now making the lid;
For the lid take a glitter card stock measuring 4 3/8 inch x 4 3/8 inch
Score it at 5/8 inch all around and cut slits on 4 sides as shown in the picture
Once they are all assembled together the finish Luminary will look like these.
Pattern paper from Cheerful meadows paper pack 4 pcs 2 inches x 5 1/4 inch
back cardstock
Pattern paper circle slighly bigger to cover your thanks circle
Halftone circle dies
Two small circles from halftone nesting circle dies
Sentiment from Courageous You stamps
Altenew Permanent Ink pad
Steps:
First I took the cardstock 5 1/2 inch by 8 1/2" (base cardstock) and score at 2 1/8 inch, 4 1/4 inch and 6 3/8 inch.
Also score the 1 inch strip in half too.
The I glued all my pattern paper to my bases. I have got two red base , 1 flower side and one black for sentiment side.
Once I was happy with everything then I stamped my sentiments from the Stamp set Courageous You , the sentiment which I used is "You are great".
Now for the assembly of this. Take that 1 inch strip which was scored in half and stick on the one side of the base cardstock from inside ( this will look like a flap). apply some adhesive on the other 1/2inch and stick on the other side of the base card stock making it look like a box.
Now coming on the other side.
First I cut out my Thanks circle on a black cardstock then I took a circle die which is slightly bigger than your thanks circle and die cut that out. Once this was done I used the same circle die to cut my pattern paper circleout too.
Adhering that to the corner of your box. This was not that tricky. Here is how I did. I used those two smaller circle and scored each of them in half . See the picture below on how I stuck them on the base box. ( I used one of the button punches instead of circle dies)
Then on top of this I stuck my circle thanks. To finish of my card I used some of the clear heart embellishments.
Project 3: Slimline Congrats cards
Materials Needed:
Altenew Courageous You Stamp set
Altenew Mega label Stamp
Bristol Smooth 8 3/4 inch x 4 3/4 inch
Back Cardtsock 9 inch x 5 inch
Altenew Black permanent Ink
White gel pen
Watercolour Brush markers.
Masking Paper
Steps:
For this card first I stamped my images using a making technique on Bristol Smooth paper.
Once stamped my flowers I went and coloured my background with the Altenew watercolour Brush markers. I have used the following colours
Ruby red ( Flowers)
Midnight Violet ( Flowers)
Sea Breeze ( Flowers)
Turquoise( Flowers)
Evening Grey (background)
Moss (leaf)
Limeade (leaf)
Fresh Lemon ( Flowers)
After they were all dried I used white gel pen to give some little dots in between my flowers.
For my sentiments I stamped congrats with mega label and stuck on my card finishing it with the back mat behind. I also added some pearls on my card.
Project 4: Card with Floral In N Out Border Die
Materials Needed:
Altenew Floral In N Out Border Die
Altenew Starry Flower Stamp
Altenew Satin white Sequins
Altenew Coral Charm Stamps
Black Cardstock 7 inch x 3 inch
White Cardstock 7 inch x 3 inch
Kraft Cardstock 4 3/4 inch x 6 3/4 inch
Kraft cardstock 2 1/4 inch x 6 3/4 inch
Black cardstock 2 1/4 inch x 6 3/4 inch
Altenew Black permanent Ink
White spray
Steps:
First I took the piece if Kraft cardstock which measures 2 1/4 inch x 6 3/4 inch.
I die cut out the border from that Strip of cardstock.
Then I took the back card stock with same measurements I turned my border die and outlined the die on the black cardstock.
Then fussy cut my out line to give a back backing on the cut out image.
On my base Kraft cardstock I then went and made a line slightly on the left of the middle of my card stock so that I can stamp some foliage on the other side of the card . For my foliage I have used the coral charm stamps.
After that I stock my die cut out Border with the Black mat on the line of the back cardstock. Sprayed some white and put my Satin white emblishments.
Stamped my sentiments from the stamp set called Starry flowers and then got my black and white backing on the back of the base Kraft cardstock.
Today I have tried to make a desktop calendars tutorial. I have used Helmar Scrapdots. This glue is fantastic to work with and they are quick to dry too. They do give you ample time to play around and get the things at right place.
I have tried to create a video tutorial for easier understanding. I may not be great at making videos (its like teething problem) but I have tried my best to explain myself on how I created this Desktop calendar.
Hello Everyone, Hope you all are enjoying the blog hop . You have just arrived from the blog of Nancy McClelland
Today I have another project for Altenew Educator Blog hop. Before going on to my project , I would like to thank all the front line workers who are working for all of us during this pandemic event. For this purpose I have created a card to Thank everyone.
Materials :
For this card I have used the following materials.
Altenew Watercolor Brush Markers
Altenew Permamanet Ink
Altenew mini ink cubes
Altenew Adhesive runner
Black cardstock
White Neenah cardstock
Black fine point pen
White embossing powder
Versamark Ink
Beautiful day Stamp and dies
Build a Flower begonia
Many thanks Stamps
Steps:
For my background I have created a video for you all to have a look how I created that.
https://www.youtube.com/watch?v=o_Umn06_IfU
For my colouring:
I have used Citrus Burst and Purple wine to Colour my flowers and for my leaves I have used Citrus Burst with sweet leaf.
Putting Together:
For my base I cut a black piece of card stock which is 4.25'x 5.5' and stuck the back ground which I created and is slightly smaller than black.
Then I arranged all flowers and Leaves the way I wanted .
One of the flower which is on the top is stuck with the foam tape to give dimensions.
I heat embossed word thanks with white embossing powder, for the stamp I have used thank you word from the set called Many Thanks.
I have also used couple of water drops to give it a fresh look .
And lastly to finish my card I took a fine black pen to create a border around the area.
Prizes:
Altenew is giving away a $30 gift certificate to 3 lucky winners! Please leave a comment here on the Altenew Card Blog(https://wp.me/p6Dps1-bBV) by 6/17/2020 for a chance to win.
We’ll also draw a winner to receive a $15 Altenew gift certificate from the comments left on each designer’s blog on the blog hop list below. All winners will be announced on the Card Blog on 6/21/2020.
There’s MORE! We will pick 2 of our favorite handmade creations from those who joined the linky party and they will each receive a $15 Altenew gift certificate!
Special offer:
FREE U.S. shipping with code HAPPY6T or $5 OFF international shipping with code SHOPPING6T at checkout on orders over $29. Offer valid from 6/10/2020 at 12:01 am EDT through6/11/2020 at 11:59 pm EDT. Shop HERE! Not valid on prior purchases. Cannot be combined with other promo codes. Not valid on Altenew Academy Classes and Virtual Workshops.
This is no ordinary hop! We want you to join in on the fun as well. There is a Linky Party going on at the Altenew Card Blog. All you have to do is link up your creations based on the theme of the hop, which is, “Giving Thanks” and mention that you are taking part in the Altenew Educators Blog Hop and Linky Party. So what are you waiting for?! Link up!
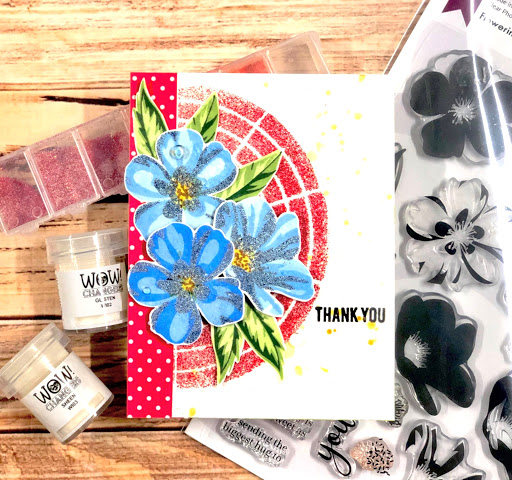
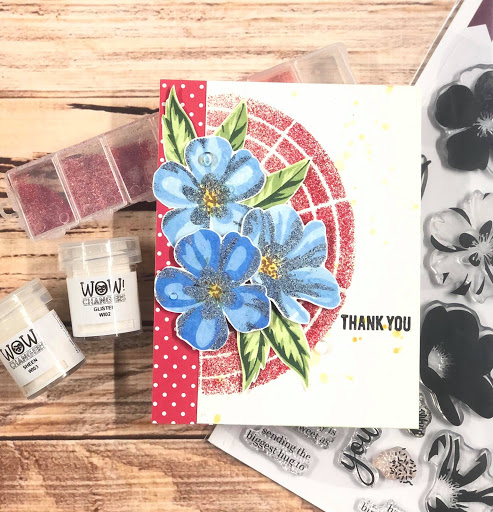
Hello All, I am here again with another Card I created with Altenew stamps, dies and Wow! Changers embossing powder. When I saw these wow embossing powder , I was so fascinated to use them. So here is a card that I made.
Here is a step by step tutorial for you to try it yourself too. Materials Needed for this card:
Neenah Solar white
Altenew Black permanent ink
Altenew Cheerful Meadows paper pack
Altenew Flowering Cistus Stamp set and Coordinating dies
Altenew Greenfield Inks
Altens Lapis Ink pads
Altenew Warm Sunshine ink pad
Altenew Expresso Ink Pad
Wow! It changes Embossing powder
Wow Embossing powder Blue .
Altenew Colour Wheel Die
Altenew Golden Spray
Wow embossing powder red glitz
Versamark embossing ink pad
Steps for background:
First I die cut out a colour wheel and will make it work as a stencil.
Then I mixed Wow sheen from wow Changers with a wow red glitz embossing powder in a separate container.
Then I took my die cut and placed over the neenah solar white and gently dabbed over it with versamark ink pad so that I can sprinkle my mixed red glitz and sheen over it.
Then heat embossed.
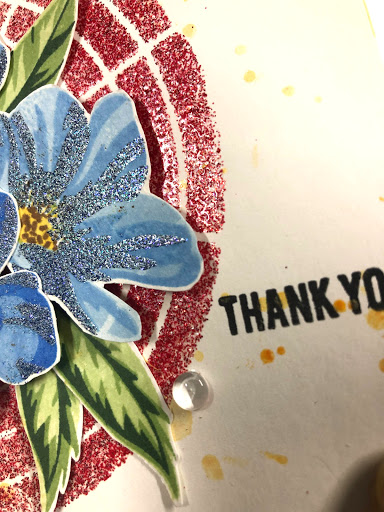
Can you see the difference in both the embossing powder? Wow Changers really changes!
Steps for Flowers and Leaves:
For my Flowers I used the ink pad Lapzis. Since its a 3 layer flower so for my lighter flowers I took the lightest to the 2 generation ink pad * and for darker I started from 2nd light and 3rd ink pad*.
* when I was doing last layer instead of using my ink pad I used versamark embossing ink and a mixed embossing powder ( which is now mixe of Wow Blue embossing powder with Wow Changer Glisten)
For my leaves I have just used and layered them with Green field Ink pads.
For my final touches before arranging my cards I splattered some Gold spray from Altenew and stamped my Thank you sentiment at last.