Left Continue shopping
Your Order

You have no items in your cart

Promotion
Read more
Explore endless possibilities with Auzz Trinklets N Krafts
Currency

Blog / Neenah

Altenew April 2020 Stamps/Dies/Stencils/Stamping Mat/Sequins Release Blog Hop + Giveaway

Altenew April 2020 Stamps/Dies/Stencils/Stamping Mat/Sequins Release Blog Hop + Giveaway

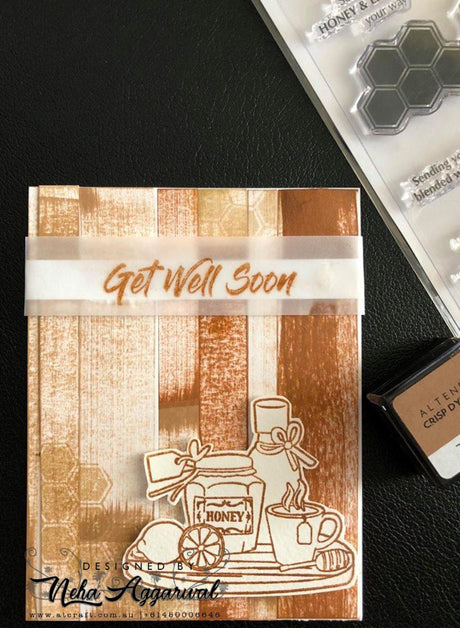
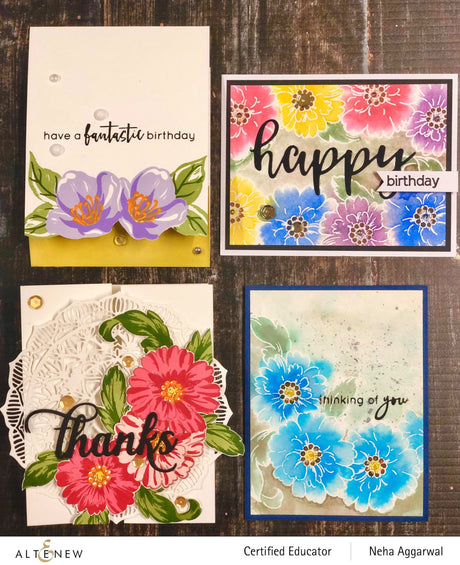
Hi Everyone,

Today I am so excited to be on the April release Blog hop for Altenew as a guest Designer . You have come all the way from Therese Calvird blog hope you all had fun reading and watching her blog.

Here are the cards which I have created with the upcoming new release. I am very excited to share what I have made.

So the five cards are with the April release Stamps :

Precious Blooms Stamp Set

Zig Zag Floral Stamp Set

Just Jasmine Stamp set

I have also used some of their sequins which are are releasing as well

Sequins - Satin Gold Sequins - Antique Gold Sequins - Satin White

Lets get on to the step by step details:

CARD 1:

Materials Used:

  1. Zig Zag Floral Stamp set
  2. Green Fields Ink Pad
  3. Sentiments from Just Jasmine Stamp set
  4. Neenah Solar White
  5. Shades of purple Ink pads
  6. Pocket full of shine shine ink pads
  7. Altenew Obsidian ink

Steps:

  1. For the first Step I took a A4 Neenah solar white Card stock and trim down to a size of 4.25'x 7.5' you will get two piece for this.
  2. Then on both the card stock score at 2"
  3. Now take one of the piece and stamp your flowers nearly to the edge. The layering guide can be found on the back of your stamps for the Zig Zag Florals.
  4. Once finish fussy cut out the extra piece from the bottom where the image was stamped.
  5. For the yellow part which is done on the other piece of card stock ,I have used honey Drizzle from pocket full of shine and done some blending with my Blending brush.
  6. Stick both the piece together so that the bottom yellow in underneath the stamped image.
  7. To finish of my card I have used the sentiments from the Stamp set Just Jasmine. and also placed some dew drops.

CARD 2:

Materials Used:

  1. Precious Blooms Stamp Set
  2. Green Fields Ink Pad
  3. Red Sunset Ink Pads
  4. neenah Solar White
  5. fancy thanks Die
  6. Delicate mandala die
  7. Altenew Obsidian
  8. Antique Gold Sequins

Steps:

  1. For this again I took a A4 Neenah solar white Card stock and trim down in half from Long side which gives me two piece of 4.25'x 11'
  2. Then on both the card stock score at 2" and 4" and folded and stick the middle together
  3. I also die cut out the Delicate mandala die on neenah solar white 80lbs
  4. I first stamped two times the floral image. First on Neenah Solar white and other on a masking paper. And fussy cut the masking paper one or use the dies if you have.
  5. Once I finished stamping the first floral image I covered that with the masking paper and stamped one more so that I have three flowers together .I followed the layering guide provided on the back of the stamps set. I love fussy cutting so I cut out my floral image but you can use dies to cut them out.
  6. I also stamped several leaves with Green field Ink pad and die cut them out too.
  7. For my Sentiments, I cut out three piece of Thanks from Fancy Thanks die and layered them on top of each other to give depth.
  8. I stuck the delicate mandala on one side of the card base and then used foam tape to stick my floral Image. Once done, I stuck all my leaves where I wanted.
  9. To finish of my card I have used Antique Gold Sequins.

CARD 3 and 4 :

The two cards I am explaining together because they have the similar techniques , but I have used different Colours in them.

Materials Used:

  1. Precious Blooms Stamp Set
  2. Green Fields Ink Pad
  3. lapis Ink Pads
  4. Rose Petal Ink pad
  5. Pocketful of sun shine ink pad
  6. Shades of purple ink pad
  7. Scripty Wold die 2
  8. Halftone Happy Stamp
  9. neenah Solar White for card base
  10. Strathmore Watercolour paper
  11. Altenew Obsidian
  12. Antique Gold Sequins

Steps for water Colouring: this step is for both cards and you just need to just change colours as per your requirement.

  1. Trim your watercolour card stock to 5.5 ” by 4.25” and stamps the floral image where you want using white embossing powder and versamark Ink. Use a heat tool to set.
  2. Onto a piece of masking sheet, stamp the floral images again and cut these images out, leaving a little border. Place the equivalent mask over your first stamped image and position your next stamped image. Repeat the process as in Step 1 – use embossing ink, embossing power and heat to set
  3. Do the above 1 and 2 for your leaves as well.
  4. Press out your lightest ink colour on to a glass mat and spritz with water. Load up a brush and wash this over the surface of your water colour card. Pick up more of the wash and add to the centre of your stamped image, building the colour.
  5. Take your next darkest colour ink and once again, press this on to your glass mat and spritz with water. This time, add this colour to where the darker areas would be in your design; in this case, it’s the centre of the flowers and areas that would be in shadow.
  6. Next, take your darkest ink colour, press this on to your glass mat and spritz with water. For this final layer, concentrate your colour to thevery centre of the flower and areas where there would be the most shadow. The colours from your previous layers should blend together giving a more natural effect.
  7. To make the image “pop” from the page, water down your darkest ink colour and add a shadow in the areas that would be underneath your design.

Additional Steps for Blue card:

  1. I used the sentiments from Just Jasmin
  2. I also splattered some black jet black ink pad diluted with water to add extra effects in the back ground.

Additional Steps for Happy Birthday card:

  1. I cut our Happy word from the die set Scripty Word 2 and stamped Birthday from halftone Happy Stamp set.
  2. To finish of my card I have used Antique Gold Sequins as flower centers.

CARD 5 :

Materials Used:

  1. Just Jasmin Stamp Set
  2. Cotton Candy Ink pad
  3. Cotton candy Artist Marker
  4. Fancy Thanks Die
  5. Neenah Solar White
  6. Altenew Obsidian

Steps:

  1. Take a piece of 4.25'x 5.5' neenah Solar white
  2. Place your Stamps on the cardstock to create your background with clear embossing powder and Versamark ink pad
  3. Once you are happy with your background , take your artist marker and give same shading to your flowers as you like.
  4. With the help of Blending brush and Cotton candy Ink pad, colour the whole background.
  5. Cut out a piece of Thanks from the Fancy Thanks dies and adhere them to your card.
  6. I stamped the sentiments from the Just Jasmin stamp which says "Thanks for all you Do" I trim the thanks out from the sentiment after stamping and just used the words "for all you do".

Product Links:

Please click HERE to see the links to our new products. Here is the link to the April 2020 release collection page, listing all of the new products: https://altenew.com/collections/make-a-statement-release

Prizes:

To celebrate this release, Altenew is giving away a $50 gift certificate to 6 lucky winners! Please leave a comment on the Altenew Card Blog and/or Altenew Mixed Media Blog by 4/23/2020 for a chance to win.

We’ll also draw a winner to receive a $20 gift certificate from the comments left on each designer’s blog on the blog hop list below. All winners will be announced on the Altenew blogs on 4/26/2020.

Blog Hop Order:

Altenew Card Blog

Amber Rain Davis

Terri Koszler

Laura Bassen

Jaycee Gaspar

Kelly Griglione

Jennifer McGuire

Virginia Lu

Alex Syberia

Nathalie DeSousa

Mindy Eggen

Nicole Watt

LauraJane

Laurie Willison

TaeEun Yoo

Altenew Mixed Media Blog

Emily Midgett

Norine Borys

Laura Volpes

Nicole Picadura

Tania Ahmed

Svitlana Shayevich

The Hedgehog Hollow

Ashlea Cornell

Vicky Papaioannou

Maryam Perez

Sveta Fotinia

Reiko Tsuchida

Erum Tasneem

Ivana Camdzic

Kymona Tracey

Christine Pennington

Therese Calvird

Neha Aggarwal ( YOU ARE HERE)

Lydia Evans

Hope you all had fun reading my blog. You next stop is Lydia Evans

Regards

neha

Read more
Altenew Educator "For the Love of Flowers" Blog Hop and Linky Party + Giveaway

Altenew Educator "For the Love of Flowers" Blog Hop and Linky Party + Giveaway

Hello Everyone .

Thank you for stopping by on my blog. Hope you have enjoyed reading Teri Stokes blog . Here is the List of the educators blog.

Altenew Card Blog

Michelle Ochoa Murray

Nandini Karmarkar

Terri Marie Koszler

Irina Fonina

Amy Hill

Vicki Finger

Laurel Beard

Teri Stokes

Neha Aggarwal

Nenette S. Mademoiselle

Nancy McClelland

Eva Bussom

Amber Rain Davis

Rosie Neustaedter

Patty Mello

Helen Kalb

Teri Wilson

Christine Pennington

Maryam Sharara

Nicole Watt

Virginia Lu

Now coming on to my card details .Its been such a long time since I wrote my last blog.

I am here again for another blog hop for Altenew Educators .

I have created two cards for my Blog hop, both using the Alcohol Artist Marker reinkers, Yupo paper and rubbing Alcohol, along with the Altenew Ink pads and stamps.

Here are two cards which I have created.

Let me explain you how I created my cards.

CARD 1:

Material Used:

Stamps: Simple Beauty Stamp and Fancy Greeting.

Background with Alcohol Artist Marker Reinker: Persian Blue

Black Obsidian Ink for stamping my sentiment.

Neenah Solar white for my Card base 4 1/4' by 5 1/2' , Sentiment and flower stamping

White embossing powder along with Versamark and heat gun

Altenew sapphire ink pad from Glacier cave ,Warm and Cozy Ink pad and Greenfields

YUPO paper Medium weight

Rubbing Alcohol or Blending Solution

Steps:

1. To make the background I first took the alcohol ink and dropped few drops on my YUPO paper ( measures 4 1/4' by 5 1/2' ) . Spreading that ink with the help of a straw and also used blending solution to make it more runny across the paper.

2. Once the background was all dried , then I used the Sapphire ink pad from Glacier Cave Altenew inks and stamped the swirls used from Simple beauty stamps on the yupo. Once they were bit dry , I took my microfiber cloth and buffed those stamped images so that they look faded stamped images on the background.

3. Now separately on a Neenah solar white I heat embossed with white my flowers from Simple Beauty Stamp set and layered them with the warm and cozy ink pad and Greenfields.

4. I also stamped the sentiment with Black Obsidian on Neenah to put behind my flowers.

5. I stuck my flower on with the foam tape and the rest with the Altenew Adhesive.

CARD 2:


Material Used:

Stamps: Wonderland Stamp, Hello Die and Ornate Cover Die

Background Alcohol Artist Marker Reinker: Midnight Violet and Ruby red

Black Obsidian Ink for stamping my flowers.

Neenah Solar white for my Card base , flower stamping

A piece of gold Foil

YUPO paper Medium weight

Rubbing Alcohol or Blending Solution

Vellum

Steps:

1. In this card first I dry embossed my background with the help of the Ornate Cover die on my Yupo paper. If you don't know how to emboss with a die you can follow Lydia's Video here to see how it can be done.

2. To make the background after doing the embossing I took the alcohol ink and dropped few drops on my same YUPO paper ( measures 4 1/4' by 5 1/2' ) and spread that ink with the help of a straw and also used blending solution to make it more runny across the paper.

3. Once the background was little dried , I took a piece of foil and rubbed on the areas which were still wet. Because it being wet the foil got stuck to those wet areas.

4. After I was happy with my background I cut that out in four equal parts and stuck on the neenah white card panel measuring 4 1/4'by 5 1/2' with the help of a foam tape.

5. For My hello word I die cut three pcs of hello and stuck them together to get dimensions.

6. Because I had a very heavy background so I decided to stamp my flowers black and white . I stamped one of the stamps from the wonderland stamp with Black obsidian on Neenah Solar white paper.

7. After finishing all stamping I first put a piece of vellum on the bottom of the card following the 2/3rd rule. Then I placed my sentiment die cut on it along with the stamped flower image to finish off my card.

Hope you all liked the way they turned out. Please do not forget to leave me a comment if you like my creation.

Prize info:

Altenew is giving away a $30 gift certificate to 3 lucky winners! Please leave a comment here on the Altenew Card Blog by 3/11/2020 for a chance to win. We’ll also draw a winner to receive a $15 gift certificate from the comments left on each designer’s blog on the blog hop list below. All winners will be announced on the Altenew Card Blog on 3/14/2020.

There’s MORE! We will pick 2 of our favorite handmade creations from those who joined the linky party and they will each receive a $15 gift certificate to our store!

Special offer: Save 15% off on ALL Stamp & Die Bundles from 3/5/2020 at 12:01 AM EST until 3/6/2020 at 11:59 PM EST. https://altenew.com/collections/stamp-die-bundles No code needed to enjoy this sale! Not valid on previous purchases. Excludes February 2020 release products.

SHOP HERE: https://altenew.com/collections/stamp-die-bundles

At present you were with me , Neha Aggarwal. You can now go to the Next Educator's Blog which you can find from the List below.

Altenew Card Blog

Michelle Ochoa Murray

Nandini Karmarkar

Terri Marie Koszler

Irina Fonina

Amy Hill

Vicki Finger

Laurel Beard

Teri Stokes

Neha Aggarwal

Nenette S. Madero

Nancy McClelland

Eva Bussom

Amber Rain Davis

Rosie Neustaedter

Patty Mello

Helen Kalb

Teri Wilson

Christine Pennington

Maryam Sharara

Nicole Watt

Virginia Lu

Thank you for Stopping By

Neha

Read more

Create a Scene with Altenew Stamps

Hello Everyone,
I am back again with my card blog post. This time I have created a scene using two stamps from Altenew which are Winter cottage and Pine Tree Stamps.
I have also done some making using Inkadinkado Masking sheets.
First I have cut out my circle and the slopes from my masking sheets.
Then I have tried to use the distress inks Salty ocean , Blue print sketch and Tumbled glass to create sky and some of the snowy effect for the slopes using the masking cut outs.
After that I planned trees and the cottage stamping them with the Jet black ink from Altnew on Neenah solar white cardstock.
I have layered my card with two colored pattern paper which I had in my stash.
Masking technique is fun and I have really enjoyed doing this.
Hope to learn more and use more of Altenew Stamps and Dies as it looks like I am getting too much obsessed with this Brand now :D
Hope you all like it and please don't forget to leave some comments for me.
Thanks for Stopping by
Regards
Neha.
Read more
Altenew Let it shine Card

Altenew Let it shine Card

Hello Bloggers,
Hope you all are doing well.
Today I have created another card for my AEP which has a theme Let it shine, though my card this time does not have shine that much as using a bit embossing powder make it only have shimmering look on it.
I can very well see that the Embossing powder is very hard to see on this above image to I have tried taking a close up picture for the same.
I have made my own background using Altenew Mini Ink cubes which very well goes with my Card theme.
Hope you all like it. Don't forget to leave comments below it really boosts my morale.
Happy Blogging and Crafting.
Regards
Neha
https://atcraft.com.au/shop/stamps/altenew-gel-well-soon-free-shipping/ https://atcraft.com.au/shop/cardstock/neenah-110lb297gsm-classic-crest-cardstock-8-5x11-pack-of-50pcs/ https://atcraft.com.au/shop/ink-pads-and-reinkers/altenew-coffee-break-ink-pad/ https://atcraft.com.au/shop/embossing-powder/super-fine-embossing-powder-1oz-clear/
Read more

Altenew All About Layering

Hello Everyone, Its me with another blog post for Altenew's challenge All about Layering 2. I have given my second attempt and made a Card with the Build a flower Camellia. Following with my teacher tips I created this beautiful background using Altenew ink pads. They were really easy to follow the guide lines and stamp the image. I have used the Neenah solar white 80lbs for stamping my images.

Hope you all will like it. Please do let me a comment to boost my morale. Happy Crafting Regards Neha

Read more

DT Teresa - Mother's Day

Hello Everyone!
Today I am sharing a cheerful card for Mother's Day, our theme for the month of May.
This card uses Neenah Classic Crest 110lb Smooth Solar White Cardstock for the base which is cut with a paper trimmer at 4 1/4" x 11" and scored with a teflon bone folder at 5 1/2" to make a top folding card of 5 1/2" x 4 1/4".
I stamped the Simon Says Stamp Circle Doodle Background inVersamark Ink onto a piece of 5 1/2" x 4 1/4" Strathmore Bristol Cardstock after using the EK Tools Powder Tool to guard against stray embossing powder. I then covered the stamped background withRanger Clear Embossing Powder and heat set the powder with aWagner Heat Tool.
I then chose colours of the rainbow from my collection of Zig Clean Color Real Brush Markers and painted the rings of the circles on the card in ROYGBIV (red, orange, yellow, green, blue, indigo, violet) order and I threw pink in there too, for good measure! I lay down a small amount of each colour in a ring and then blended out the colour using a Zig Wink of Stella Brush Marker which created a shimmer all over the card. The shine of the embossing powder and shimmer on the colour looks beautiful, but difficult to capture in a photograph.
I die cut butterflies using Pretty Pink Posh Blissful Butterflies Coordinating Dies from the coloured cardstock, once it had dried and with the same die I also cut some butterflies from a black foam sheet using the Sizzix Big Shot Machine. I allowed the foam cut butterflies sit over night to allow them to bounce back into shape after being compressed in the Bigshot Machine before adhering them to the bottom of the coloured butterflies with Ranger Multi Medium Matte.
I cut a triangle away from the coloured piece and adhered it withKokuyo Glue Tape Roller to the bottom of the left hand side of the card front and cut a strip of Simon Says Stamp Cardstock in Doll Pink and two thin black cardstock strips to run down the length of the triangle. On to the pink strip, I stamped the sentiment from Clearly Besotted Message Me in Versamark Ink and embossed it withRanger Embossing Powder, White and placed the three strips on to the card front using Ranger Multi Medium Matte. I placed Auzz Trinklets N Crafts Dew Drops 6mm on either side of the sentiment, again using Ranger Multi Medium Matte, which is not at all visible under the clear domes once it has dried. The foam-raised butterflies were then placed onto the card front.
To complete the card, I cut black cardstock into a card front-sized rectangle from My Favorite Things Blueprints 16 with the Sizzix Bigshot and then lay the rectangle die from My Favorite Things Blueprints 13, ensuring it was centred onto the larger die cut rectangle and ran it through the Bigshot once again. This left me with a narrow frame which I glued onto the card as a finishing touch.
Thankyou for following along with me today. Please feel free to ask questions if anything needs clarifying. If you cannot find the items I have used (listed below) in the Auzz Trinklets and Crafts store, be sure to drop Neha a message via email or Facebook and she will do what she can to order the product in for you.
Happy crafting and have a great day!
Teresa
Products used: Neenah Classic Crest 110lb Smooth Solar White Cardstock
Paper trimmer
Teflon bone folder Simon Says Stamp Circle Doodle Background Versamark Ink Strathmore Bristol Cardstock EK Tools Powder Tool Ranger Embossing Powder, Clear Wagner Heat Tool Zig Clean Color Real Brush Markers, 60 pack No. 022 Carmine Red No. 070 Orange No. 050 Yellow No. 041 Light Green No. 031 Cobalt Blue No. 030 Blue No. 081 Light Violet No. 025 Pink Zig Wink of Stella Brush Marker Pretty Pink Posh Blissful Butterflies Coordinating Dies Black foam sheet Sizzix Big Shot Machine Ranger Multi Medium Matte Kokuyo Glue Tape Roller, Permanent Simon Says Stamp Cardstock, Doll Pink Black Cardstock Clearly Besotted Message Me Ranger Embossing Powder, White Auzz Trinklets N Crafts Dew Drops, 6mm My Favorite Things Blueprints 16 My Favorite Things Blueprints 13
Read more

DT Teresa - Shabby Chic 2

Hello!
I have another shabby chic project to share with you today, catching up now!
This card uses Neenah Classic Crest 110lb Smooth Solar White Cardstock for the base which is cut with a paper trimmer at 4 1/4" x 11" and scored with a teflon bone folder at 5 1/2" to make a top folding card of 5 1/2" x 4 1/4".
I used the scalloped frame from My Favorite Things Blueprints 20to place on the card base, moving it slightly above the fold of the card to create a top folding scalloped base card once it was run through theSizzix Bigshot. I then used the same frame die to cut a piece from Simon Says Stamp cardstock in Audrey Blue and adhered this to the partially scalloped card base. This covered the top fold of the card base - as the frame die was moved above the card base before cutting to retain the fold, the edge was flat. Using the coloured cardstock allowed the opportunity for a complete scalloped card front. Using Versamark Ink, I stamped a floral image from The Ton Fresh Cut Dahliasstamp set numerous times onto the card, providing a subtle background.
I used Neenah Classic Crest 80lb Smooth Solar White Cardstock and stamped various images from Hero arts Color Layering Bird and Branch and WPlus9 Fresh Cut Florals to create my own patterned cardstock piece. Altenew Inks provided a wonderful feminine, pastel pallet using Frosty Pink, Buttercream, Frayed Leaf and Peach Perfect. From this I cut a teapot, teapot lid and teacup from My Favorite Things Dienamics Tea Party and placed aside.
I then die cut multiple (7-8) tea pots, lids, teacups and (42-48) sugar cubes with the dies from plain white cardstock and adhered the pieces together using Ranger Multi Medium Matte to make sturdy embellishments. Before adding the top stamped piece of the tea pot lid and tea cup I cut away a small area of the plain adhered pieces with myTim Holtz scissors to allow the pieces to sit flush over the top of the teapot. I then added the top piece and glued the teapot, lid, cup and sugar cubes into place using Ranger Ink Multi Medium Matte.
After brushing over the area to be stamped with an EK Tools powder tool, the sentiment stamp from My Favorite Things Cookie Crumbs was cut apart and stamped in Versamark Ink with my MISTI stamping tool. I used Hero Arts white embossing powder for a stand out sentiment, paired with a Wagner Heat Tool.
I die cut a spoon with My Favorite Things Dienamics Tea Party from a silver foiled piece a had previously made from Heidi Swapp Minc Reactive Foil using a Heidi Swapp Minc Machine. I cut away the lower half of the spoon and placed the handle section against the top of the teacup, adhering it to the card base and giving the illusion of it sitting inside the cup.
The sugar cubes were then swiped with the wonderful Zig Wink of Stella in Clear to provide a shimmer and a sparkle! Finally, I placed some lovely fabric flowers onto the teapot. An elegant, feminine card is the result and would make a great Mother's Day card also.
Thankyou for following along with me today. Please feel free to ask questions if anything needs clarifying. If you cannot find the items I have used (listed below) in the Auzz Trinklets and Crafts store, be sure to drop Neha a message via email or Facebook and she will do what she can to order the product in for you.
Happy crafting and have a great day!
Teresa Products used: Neenah Classic Crest 110lb Smooth Solar White Cardstock
Paper trimmer
My Favorite Things Blueprints 20
Sizzix Bigshot Machine
Simon Says Stamp cardstock in Audrey Blue
Versamark Ink
Neenah Classic Crest 80lb Smooth Solar White Cardstock
Hero Arts Color Layering Bird and Branch
WPlus9 Fresh Cut Florals
My Favorite Things Cookie Crumbs
Wagner Heat Tool
Heidi Swapp Minc Machine
Zig Wink of Stella in Clear
Fabric flowers
Read more

DT Teresa - Romance 2

Hello! I hope you all enjoyed your Valentine's Day yesterday, whether or not you celebrated the day designated for love!

Today I am sharing a card that fits the bill for Romance, our theme for February here on the Auzz Trinklets and Crafts blog.

This card uses Neenah Classic Crest 110lb Smooth Solar White Cardstock for the base which is cut with a paper trimmer at 4 ¼“ x 11” and scored with a teflon bone folder at 5 ½“ to make a top folding card of 5 ½“ x 4 ¼”.
I chose My Favorite Things Cookie Crumbs and the coordinating My Favorite Things Dienamics set You're the Milk to my Cookie for this project.
I used the sprinkles/hundreds and thousands stamp meant for a cookie and stamped it multiple times onto the card base with Altenew Crisp Dye Ink in Frosty Pink.
The layered frames were die cut from Neenah Classic Crest 80lb Smooth Solar White Cardstock with Simon Says Stamp Stitched Rectangles dies. I lined up the outside die with the third largest die to create the first frame and then used the outside die with the second largest die to create the top frame and adhered them together using 3M Scotch Double Sided Foam Tape and stuck these to the card base with double sided tape.
I cut four milk bottles from Neenah Classic Crest 80lb Smooth Solar White Cardstock and glued them together to create a dimensional piece and did the same with kraft cardstock to create the cookie, using the larger of the two circular dies in the set.
My Heidi Swapp Minc machine then came into action. I foiledHeidi Swapp Minc Sheets using Heidi Swapp Reactive Foil in Light Pink, iCraft Deco Foil in Red and iCraft Deco Foil in Gold. I then used dies from the MFT set to diecut the pieces I needed from the different colours of foil using my Sizzix Big Shot machine. The heart dies came from the Sizzix dies set that coordinate with Tim Holtz's Stampers Anonymous Crazy Thingsstamp set. The foiled pieces left over, I put away for future projects. I used a shim when cutting the lid for the bottle so the debossing was a little deeper and more obvious.
I took the label for the milk bottle and heat embossed the word milkfrom the MFT stamp set using Versamark ink, Hero Arts white embossing powder and Wagner heat tool. Prior to stamping, I used an EK Success Powder Tool on the foil to prevent stray embossing powder from sticking in places I did not want it, then wiped away the powder once the embossing had cooled with a microfibre cloth. I was not sure how the foil would react to the great heat of the tool, but was happy to see that it provided an interesting effect and a wonderful texture. I think I will be using this technique again as it would be perfect for a vintage look.

I glued all the pieces together and placed them onto the card base usingRanger Multi Medium Matte before stamping and heat embossing the sentiment from the MFT stamp set with Hero Arts white embossing powder onto a strip of black cardstock which I adhered with 3M Scotch Double Sided Foam Tape. Again, I used the EK Success Powder Tool prior to stamping on the black cardstock, wiping the powder away with a microfibre cloth after the embossing was done.

I showed this to my husband once I had finished and he asked if he could write in it and give it to me. Ha!

Thankyou for following along with me today. Please feel free to ask questions if anything needs clarifying. If you cannot find the items I have used (listed below) in the Auzz Trinklets and Crafts store, be sure to drop Neha a message via email or Facebook and she will do what she can to order the product in for you.

Happy crafting and have a great day!

Products: Neenah Classic Crest 110lb Smooth Solar White Paper Paper trimmer Teflon bone folder My Favorite Things Cookie Crumbs My Favorite Things Dienamics You're the Milk to my Cookie Altenew Crisp Dye Ink in Frosty Pink Neenah Classic Crest 80lb Smooth Solar White Cardstock Simon Says Stamp Stitched Rectangles dies 3M Scotch Double Sided Foam Tape Double sided tape Kraft cardstock Heidi Swapp Minc machine Heidi Swapp Minc Sheets Heidi Swapp Reactive Foil in Light Pink iCraft Deco Foil in Red iCraft Deco Foil in Gold Sizzix Big Shot machine Sizzix/Tim Holtz dies set Crazy Things EK Success Powder Tool Versamark ink Hero Arts white embossing powder Microfibre cloth Wagner heat tool Ranger Multi Medium Matte
Read more